Smile Design Cases
Case 35
Smile Makeover Of A Congenitally missing Lateral Incisor With Dental Veneers And Laser Crown Lengthening Under Dental Microscope
Cosmetic Dentist in Toronto
Fixing Missing lateral incisor with Dental Veneers

Before Smile Transformation

Digital Smile Design Planning of the Smile Transformation

Digital Smile Design Planning of the Smile Transformation

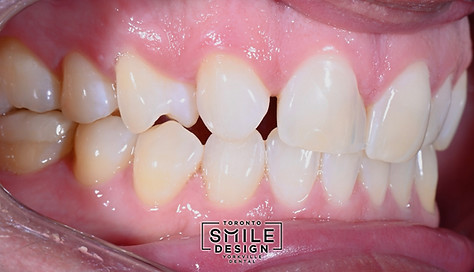
Intraoral Picture of the patient before Smile Makeover
A Smile Makeover in Toronto
Our patient came to our practice with malalignment in his upper teeth caused by a congenitally missing lateral incisor. We had our initial consult, and we showed him some similar cases. After that, we explained some treatment possibilities and the Digital Smile Design (DSD) approach. Finally, he learned that he could see the outcome before he started; he was amazed!
With DSD, we can design, plan and visualize our smile makeover patients before we treat them. To provide this approach, in Toronto Smile Design - Yorkville Dental, we use the most up-to-date digital dentistry and photography tools in the dental industry!
We use high-resolution cameras to take patients' intraoral-extraoral pictures and videos. After that, we start our new patient exam (NPE). In the NPE, we use the latest and most advanced intraoral scanner Dentsply Primescan to obtain the intraoral digital impressions of the patient with high precision. If necessary, we take XRAYs.
After obtaining all the information we need, we book the second appointment for the test drive of the new smile and treatment plan presentation. With our comprehensive approach, we treat not only the current issues but also prevent any possible future problems that might occur if left unresolved.

Photo Studio of Toronto Smile Design - Yorkville Dental

Before Smile Makeover Mock Up
After Smile Makeover Mock Up

Before Mock Up
After Mock Up

Before Mock Up
After Mock Up
Importance of Comprehensive Planning and Mock Up Session
In the second appointment, we give our patients a test drive of their new smiles. Again, we use 3D design and printing tools to make this happen. We transfer our plan to the patient's mouth and take the same pictures and videos. We want our patients to see the final result on day one! That's why we use the initial images and videos we obtained from our patients to compare the possible outcome.
Seeing the treatment's effect changes the value of our dental treatment. Patients understand the reasoning behind our treatment without us saying a word.
Following the mock-up, we provided two treatment plans. The main treatment plan (explained below) and the secondary treatment plan (consisting of crown lengthening, teeth whitening and nine dental veneers) which is faster but a little more invasive than the main treatment plan. We explained all the advantages and disadvantages of both treatment plans and answered all of his questions. The main challenge of the secondary treatment plan was changing a canine tooth into a lateral incisor and a tilted premolar into a canine. At the gingiva level, this approach requires skills to make the result look impeccable.
He wanted to proceed with our second treatment plan but with fewer porcelain veneers. Instead, he requested six dental veneers.
3D Planning and 3D Printing in Digital Dentistry

Challenging Side of the Smile Makeover
Main treatment plan:
-
Opening the space with orthodontic treatment between the canine and the central incisor.
-
Placing a dental implant on the congenitally missing lateral incisor area.
-
Fixing the rest of the gum alignment issues with laser gum contouring
-
Enhancing the teeth shape with bonding or dental porcelain veneers.
SIMILAR CASE TREATED BY DR.JOHNSON WITH THIS APPROACH USING DENTAL IMPLANTS:

Opening Congenitally Missing Lateral Incisor Space

Placing dental implants on missing lateral incisor spaced and providing dental veneers on on central incisors for a better smile curve
Dental veneers are super-thin shells placed on the front of teeth to improve aesthetics. On the other hand, dental crowns are tooth-like caps that cover the entire tooth. A veneer is ideal for front teeth, while a dental crown encases both front and back teeth.
Dental Crown Preparation
Dental Veneer Preparation
Final Check - Dental Veneers on the 3D Printed Model

Final Check - Dental Veneers on the 3D Printed Model (Front)

Final Check - Dental Veneers on the 3D Printed Model (Left Side)

Final Check - Dental Veneers on the 3D Printed Model (Right Side)
When we have a well-constructed treatment plan from the beginning, applying that plan on a patient becomes super easy. Next stage was to perform laser gum contouring according to the DSD treatment plan. The biggest advantage of performing crown lengthening with laser is the fast and efficient healing with zero to mild post-op discomfort. After the laser crown lengthening procedure, we waited for three weeks for healing. During this waiting period, we provided teeth whitening because we had to match the veneer shade to natural teeth.
After the waiting and stabilization period of the gum contouring, we prepared the teeth for dental veneers following Digital Smile Design guidance. Following the preparation, we obtained the digital impressions with Dentsply Primescan and sent the impressions to our dental lab (RDT Dental Lab).
With the detailed initial planning, all our dental technician needs to do is to copy the initial plan of ours and paste it on the new dental impression. As soon as we receive the dental porcelain veneers, we took high resolution pictures of the veneers on the 3D printed models for the final check. Everything was looking awesome! It was time to have a try-in session!
In the try-in session, we removed the temporary dental veneers and inserted the porcelain veneers with try-in paste that mimics the cementation material we use for veneer insertion. Our patient loved them! It was the final cementation time and it took one appointment after the preparation of the teeth!
Cementation of two central incisor dental veneers
Our patients usually ask us the same questions. One of the most frequently asked questions about dental veneers is "How long a dental veneer lasts?" This depends on multiple factors, such as:
- Oral Hygiene Habits of the patient
- Material Strength
- Daily Habits of the Patient (Grinding, Nail Biting etc.)
- Cementation Material
- Cementation Technique
We can name more but for us, one of the most important factors that determines the longevity of our patients' veneers is the cementation technique.
With perfect rubber dam (the blue rubber you see in the video above) isolation, the success rate of resin cement increases drastically. When we use a rubber dam, we isolate the area from blood, saliva, crevicular fluids and the moisture coming from the breath of the patient ideally. This way, we can work freely in the cementation area and cement our veneers by the book.
The other factor that determines our success is the magnification we use during our treatments. In Toronto Smile Design - Yorkville Dental, we use the most advanced Dental Microscope - Zeiss Extaro 300. If you want to learn more about the advantages of microscopic dentistry please click.


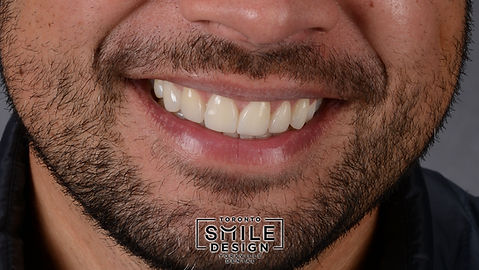
Before Porcelain Veneers
After Porcelain Veneers
SOUND ON!
If you find a path with no obstacles, it probably doesn't lead anywhere.
- Frank A. Clark

Why Choose Toronto Smile Design - YORKVILLE DENTAL?
Dr. Johnson Ozgur of Toronto Smile Design is a Cosmetic Dentist with a Master’s Degree in Oral Surgery. Choosing Toronto Smile Design means your idea of the perfect smile gets executed by a skilled and qualified Dr. Johnson, who has more than ten years of experience in the industry. That gives you peace of mind as he expertly performs the procedure to restore worn-down teeth, misaligned teeth, discoloured teeth, teeth with gaps, and broken teeth. Get in touch with Cosmetic Dentist Dr. Cansin (Johnson) Ozgur today to discuss how the design could help you.


